

If you are designing documents for print or delivering images for print, you may have had feedback: “Please use 300 ppi images!” And that might have confused you. And maybe for a good reason: it’s incomplete feedback. Which won’t solve the basic problem. So, let me explain what matters, why, and how you can calculate the minimal dimensions for images in your layouts, in a size that’s easy to understand: pixels, and megapixels.
Let’s start with the why resolution matters. Print needs a higher resolution than a monitor. Why? Because print is more limited in a certain way. If you look at monitors and other kinds of displays, every pixel can show at least 256 shades of red, 256 shades of green, and 256 shades of blue. That’s a lot of combinations… And that’s where print is limited.
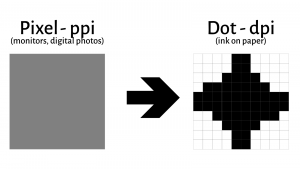
Where printed dots differ from pixels…
For conventional printing (like offset, flexo, screen printing), there are only two possibilities, two shades: ink or no ink. With gravure printing, we have the option to make the engraved cells deeper or shallower, but that’s still only a limited number of shades. So we need a clever trick to get more shades: the ‘screening’. When applying screening to an image, every pixel will be translated into a raster of even smaller dots. For simplicity’s sake, every pixel is translated into a raster of 10 by 10 dots. Now we have 10 x 10 = 100 cells that we can turn on or off, 100 cells that can have ink, or no ink. That’s why the output for print, in dots per inch, will always be larger than the input in pixels per inch from layout, from the print-ready PDF.
It’s a little bit different with digital printing, but I’m not going to confuse you by explaining that.
Which resolution? Ghent Workgroup to the rescue!
The conclusion is that you need an image with enough information to print correctly. That ‘enough information’ is translated into requirements of minimal PPI resolution in the print-ready PDF. The Ghent Workgroup (GWG) has done a great job of defining these requirements for different print applications: a newspaper is a very different application from packaging. Not only have they documented this in rather complicated and boring documents, but the GWG has also published application settings you can download for free from their website! E.g., job options for Adobe InDesign and Adobe Illustrator. Check them out! These are ready to use and will take much complexity from outputting your layout to PDF: you only need to select the right output profile!
To get to that – let’s say 300 ppi – resolution in the print-ready PDF, you need to have images with the appropriate amount of pixels in your layout document. And there it becomes a little bit more complicated. Long story short: the pixel per inch of images doesn’t matter that much; the size (or dimension) in pixels matters. If you want to know more about that, please check this article on the insights4print.ceo blog. This article includes a test involving images at 300 ppi, 72 ppi, and – why not – 10 ppi. When outputting these to a print-ready PDF, they all looked the same. Why? Because these three images had the same dimensions and the same size in pixels. And that’s what matters.
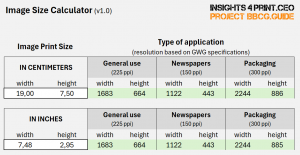
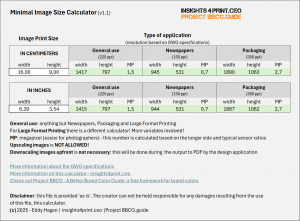
To check which minimal image size you need, I’ve created two small calculators: one for most print applications (with three categories) and another for large-format printing. That one is a bit more complicated because it involves two other factors: viewing distance and scaling factor. To make it more user-friendly, the translation into ‘megapixels’ was also added. This is probably more convenient for photographers.
This is a zip-file with both Excel files.
Upscaling? Only as a last resort!
If you think upscaling images to 300 ppi will get you rid of all these comments about resolution, think again. Although image upscaling software has improved significantly over the years, it’s still an artificial trick. Which can show artifacts. Image upscaling should only be used as a last resort if you can’t get the original, high-resolution images.
Best practice: use the original files!
A best practice is to leave images in their original resolution during the design phase. Don’t downsample them upfront! Current hardware and software are capable of working with higher resolution images. If you have huge documents filled with high-resolution images, think of a travel catalogue with hundreds or even thousands of images, and you might want to downscale them before placing them in your layout. The downsampling to the 300 ppi images in the print-ready PDF will be done during the export to PDF. The export settings will define the resolution to which images will be downscaled. Above, I always mentioned 300 ppi, but there are different requirements for different print applications; this is where the GWG comes in again. But you don’t need to worry about that. Just make sure that you put the right dimensions in my little calculators, which will show the minimal image size needed. And when outputting it to PDF, make sure you have GWG job options loaded and pick the right one! That’s the way to get rid of all that nagging about 300 ppi images.